2D arrays in Python help organize data in rows and columns, making it easy to access and change information. They are used in tasks like handling tables, game boards, or math problems. You can use nested lists for simple cases or NumPy arrays for better performance.
In this article, we’ll go through different coding challenges to improve your understanding of 2D arrays. Each challenge will focus on real-life problems, helping you think logically and solve problems with code. Let’s solve some fun challenges.
Pixel Brightness in an Image

You’re working on an image editing software where an image is represented as a 2D list of pixel brightness values (0-255). Your task is to find the average brightness of the image and determine the brightest row (the row with the highest sum of brightness values).
Test Case:
Input:
Enter image dimensions (rows columns): 3 3
Enter brightness values for row 1: 120 150 130
Enter brightness values for row 2: 100 200 220
Enter brightness values for row 3: 80 90 100
Expected Output:
Average brightness: 132.22
Brightest row: 2 (sum = 520)
Explanation:
The code processes a 2D list that represents an image’s brightness values.
- The program starts by asking the user to enter the image dimensions (number of rows and columns).
- These values are taken as a space-separated string, split into two parts using
split(), and converted into integers usingint().
- These values are taken as a space-separated string, split into two parts using
- An empty list called
imageis initialized to store the brightness values. - The program then takes input for each row of the image. The values are split into a list of strings, converted into integers, and stored in a nested list.
- To calculate the total brightness, the program loops through each row and each value, summing them up.
- The average brightness is computed by dividing the total brightness by the total number of pixels (
rows * cols). - Instead of using the
round()function, the program manually rounds the value by multiplying by 100, using integer division (//), and then dividing by 100 to keep two decimal places. - To find the brightest row, the program initializes variables
brightest_sumto store the maximum sum andbrightest_row_indexto store the index of the row. - It then iterates through the image, calculating the sum of each row.
- If a row’s sum is greater than the current maximum, it updates
brightest_sumand records the row index. - Finally, the program prints the average brightness and the row with the highest brightness sum, using a 1-based index for readability.
# Get image dimensions
rows, cols = input("Enter image dimensions (rows columns): ").split()
rows, cols = int(rows), int(cols)

# Initialize image list
image = []

# Take input for brightness values
for i in range(rows):
    row = input(f"Enter brightness values for row {i+1}: ").split()
    row_values = []

    for value in row:
        row_values.append(int(value))

    image.append(row_values)

# Calculate total brightness
total_brightness = 0
for row in image:
    for value in row:
        total_brightness += value

# Calculate average brightness without using round()
avg_brightness = (total_brightness * 100) // (rows * cols) / 100  # rounding by multiplying by 100

# Find the brightest row
brightest_sum = 0
brightest_row_index = 0

for i in range(rows):
    row_sum = 0
    for value in image[i]:
        row_sum += value

    if row_sum > brightest_sum:
        brightest_sum = row_sum
        brightest_row_index = i + 1

print("Average brightness:", avg_brightness)
print("Brightest row:", brightest_row_index, "(sum =", brightest_sum, ")")
Bakery Sales Tracker

Imagine You own a bakery that sells different types of bread. Each row in a 2D list represents daily sales for a specific type of bread, while each column represents different days of the week. You need to calculate the total sales for each bread type and the average daily sales for the entire bakery.
Test Case:
Input:
Enter the number of bread types: 3
Enter the number of days: 4
Enter sales for bread type 1: 5 7 8 6
Enter sales for bread type 2: 3 4 2 5
Enter sales for bread type 3: 9 6 7 8
Expected Output:
Total sales for each bread: [26, 14, 30]
Average daily sales: [5.66, 5.66, 5.66, 6.33]
Explanation:
The code calculates total sales per bread type and average daily sales over a given period using a 2D list (a list of lists).
- First, it takes user input for the number of bread types (
rows) and the number of days (cols). - Then, it initializes an empty list
salesto store sales data for each bread type. - It loops through each bread type and asks the user to enter sales values for the given days.
- The input values are split using
split(), converted to integers, and stored in a 2D list. - Each row (representing a bread type) is added to the
saleslist.
- The input values are split using
- After that, it calculates the total sales for each bread type:
- It initializes
total_salesas an empty list. - It loops through each row in
sales, sums up all values, and stores the total intotal_sales.
- It initializes
- Next, it calculates the average daily sales:
- It initializes
daily_totalswith zeros to store total sales for each day. - It loops through
sales, adding each value to the respective day’s total. - It calculates the average by multiplying the total by 100 (to handle two decimal places), dividing by the number of bread types, and then dividing by 100 again.
- It initializes
- Finally, it prints the total sales per bread type and the average daily sales in a readable format.
# Get input for bread types and days
rows = int(input("Enter the number of bread types: "))
cols = int(input("Enter the number of days: "))

# Initialize sales list
sales = []
for i in range(rows):
    row = []
    print(f"Enter sales for bread type {i+1}: ", end="")
    values = input().split()

    for val in values:
        row.append(int(val))

    sales.append(row)

# Calculate total sales per bread type
total_sales = []
for row in sales:
    total = 0
    for value in row:
        total += value
    total_sales.append(total)

# Calculate average daily sales
daily_totals = [0] * cols  # Initialize list with zeroes
for row in sales:
    for j in range(cols):
        daily_totals[j] += row[j]

average_daily_sales = []
for total in daily_totals:
    avg = (total * 100) // rows  # Multiply by 100 to handle two decimal places
    avg = avg / 100
    average_daily_sales.append(avg)

# Display results
print("Total sales for each bread:", total_sales)
print("Average daily sales:", average_daily_sales)
Cinema Seat Booking System

Imagine you’re going to watch the latest blockbuster at your favorite cinema. The hall has 5 rows and 5 columns of seats, all initially empty (0). As a ticket booking system developer, your job is to allow users to select a seat by entering a row and column number. Once a seat is booked, it should be marked as 1, indicating it’s occupied.
Test Case:
Input:
Enter row number (0-4): 2
Enter column number (0-4): 3
Do you want to book another seat? (yes/no): yes
Enter row number (0-4): 1
Enter column number (0-4): 1
Do you want to book another seat? (yes/no): no
Expected Output:
Seat booked successfully!
Do you want to book another seat? (yes/no): yes
Seat booked successfully!
Do you want to book another seat? (yes/no): no
Updated Seating Arrangement:
[0, 0, 0, 0, 0]
[0, 1, 0, 0, 0]
[0, 0, 0, 1, 0]
[0, 0, 0, 0, 0]
[0, 0, 0, 0, 0]
Explanation:
The code simulates booking seats in a 5×5 cinema hall.
- It first initializes a 5×5 cinema hall using nested loops.
- A list
cinemais created to represent the hall, with all seats initially set to 0 (meaning all are available). - The outer loop creates 5 rows, and the inner loop fills each row with 5 columns, each set to 0 (empty seats).
- A list
- Next, it enters a
whileloop where the user can repeatedly book seats until they choose to stop. - Inside the loop, it asks the user for the row and column number (ranging from 0 to 4).
- It checks if the seat at the specified row and column is available:
- If the seat is available (i.e., the value is 0), it marks it as booked by setting the value to 1.
- If the seat is already booked (i.e., the value is 1), it notifies the user and asks them to choose another seat.
- The user is then asked if they want to continue booking seats. If the answer is not “yes”, the loop ends.
- Finally, it prints the updated seating arrangement showing the availability of seats (1 for booked and 0 for available).
# Initialize 5x5 cinema hall with zeros using nested loops
cinema = []
for i in range(5):
    row = []
    for j in range(5):
        row.append(0)
    cinema.append(row)

while True:
    # Ask for row and column number
    row = int(input("Enter row number (0-4): "))
    col = int(input("Enter column number (0-4): "))

    # Check if the seat is available or not
    if cinema[row][col] == 0:
        cinema[row][col] = 1  # Book the seat
        print("Seat booked successfully!")
    else:
        print("Seat already booked! Try another one.")

    # Ask the user if they want to continue booking more seats
    continue_booking = input("Do you want to book another seat? (yes/no): ").strip()
    if continue_booking != "yes":
        break  # Exit the loop if user doesn't want to book more seats

# Display the updated seating arrangement
print("\nUpdated Seating Arrangement:")
for r in cinema:
    print(r)
Treasure Hunt

You are an adventurer searching for hidden treasure on an island! The island is a 5×5 grid, and your goal is to dig at various spots to uncover the buried treasure. The depth at which you dig increases with each attempt, so be careful not to dig too many times before finding the treasure.
The treasure is hidden at a secret location on the island, and your task is to guess its position by selecting row and column numbers. Each time you dig, the depth increases, and you’ll receive feedback on whether you’re getting closer to the treasure. Keep digging until you find the treasure, and along the way, track the total depth you’ve dug!
Good luck on your treasure hunt adventure!
Test Case:
Input:
Enter row number (0-4): 1
Enter column number (0-4): 2
Do you want to search another spot? (yes/no): yes
Enter row number (0-4): 2
Enter column number (0-4): 3
Expected Output:
You dug at (1, 2) with a depth of 1.
You dug at (2, 3) with a depth of 2.
Congratulations! You found the treasure!
Total depth you’ve dug: 3
Explanation:
The code simulates a treasure hunt on a 5×5 island grid.
- First, it creates a 5×5 grid using nested loops to represent the island, where all the cells are initially set to 0 (meaning untouched land).
- It marks the treasure’s location by setting specific
treasure_rowandtreasure_colvalues (in this case, row 2, column 3). - The total depth of digging is initialized to 0, and the current depth starts from 1 and increases with each digging attempt.
- The game continues inside a
whileloop until the user finds the treasure or decides to stop.- The user is asked for the row and column numbers (both ranging from 0 to 4) to choose where they want to dig.
- It checks if the chosen location has already been searched (if the value is 0).
- If the spot hasn’t been searched, the depth for that spot is updated in the grid, and the current depth is added to the total depth.
- If the user digs at the treasure’s location, a message is displayed to congratulate them, and the game ends.
- If the spot has already been searched, the user is asked to choose another spot.
- The user is then asked if they want to continue digging. If their response is not “yes”, the loop exits.
- Finally, the total depth the user has dug is displayed as the output.
# Initialize a 5x5 grid to represent the island
island = []
for i in range(5):
    row = []
    for j in range(5):
        row.append(0)
    island.append(row)

# Mark the treasure location
treasure_row = 2
treasure_col = 3

# Initialize total depth dug
total_depth = 0
current_depth = 1  # The depth starts from 1 and increases with each attempt

while True:
    # Ask for row and column number
    row = int(input("Enter row number (0-4): "))
    col = int(input("Enter column number (0-4): "))

    # Check if the location has already been searched
    if island[row][col] == 0:
        # User digs at the spot with increasing depth
        island[row][col] = current_depth  # Update the grid with the current depth
        total_depth += current_depth  # Add the depth to the total depth

        print(f"You dug at ({row}, {col}) with a depth of {current_depth}.")

        # Check if the user found the treasure
        if row == treasure_row and col == treasure_col:
            print("Congratulations! You found the treasure!")
            break  # End the game once the treasure is found

        # Increase the depth for the next dig
        current_depth += 1
    else:
        print("This spot has already been searched. Try another spot!")

    # Ask the user if they want to continue searching
    continue_search = input("Do you want to search another spot? (yes/no): ").strip().lower()
    if continue_search != "yes":
        break  # Exit the loop if the user doesn't want to continue

# Display the total depth dug
print("\nTotal depth you've dug: " + str(total_depth))
Adding Two Matrices in Python
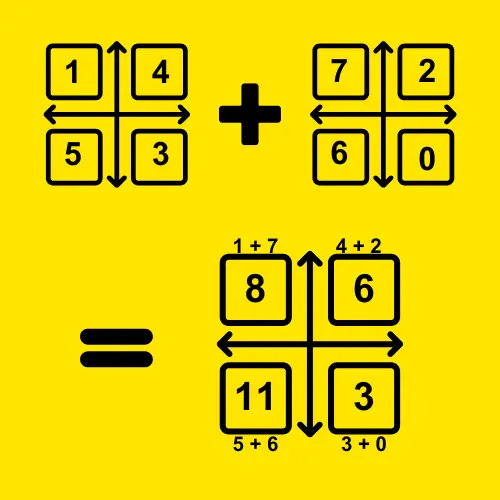
Your teacher has asked you to solve a math problem involving matrix addition. You need to add two 3×3 matrices. Input the values for both matrices and calculate the sum of the corresponding elements.
Test Case:
Input:
Matrix 1:
[1, 2, 3]
[4, 5, 6]
[7, 8, 9]
Matrix 2:
[9, 8, 7]
[6, 5, 4]
[3, 2, 1]
Expected Output:
Resulting Matrix after Addition:
[10, 10, 10]
[10, 10, 10]
[10, 10, 10]
Explanation:
The code adds two 3×3 matrices together.
- First, it initializes two 3×3 matrices
matrix1andmatrix2, filled with zeros. This is done using list comprehension, which creates 3 rows, each containing 3 zeros. - Then, it asks the user to input values for each element of
matrix1.- It uses nested loops to go through each row and column.
- For each element, it prompts the user to enter a number using
input(), and that value is stored in the corresponding position inmatrix1.
- The same process is repeated to input values for
matrix2. - After that, it performs matrix addition.
- It uses list comprehension to add the corresponding elements from
matrix1andmatrix2. For each row, it adds the elements in the same column from both matrices. - The result is stored in the
resultmatrix, where each element is the sum of the elements from the two matrices.
- It uses list comprehension to add the corresponding elements from
- Finally, it displays the resulting matrix after the addition.
- It prints each row of the
resultmatrix using a simpleforloop, showing the sum of the two matrices.
- It prints each row of the
# Initialize two 3x3 matrices
matrix1 = [[0 for _ in range(3)] for _ in range(3)]
matrix2 = [[0 for _ in range(3)] for _ in range(3)]

# Input values for matrix1
print("Enter values for Matrix 1:")
for row in range(3):
    for col in range(3):
        matrix1[row][col] = int(input(f"Matrix 1 - Element ({row+1},{col+1}): "))

# Input values for matrix2
print("Enter values for Matrix 2:")
for row in range(3):
    for col in range(3):
        matrix2[row][col] = int(input(f"Matrix 2 - Element ({row+1},{col+1}): "))

# Perform matrix addition
result = [[matrix1[row][col] + matrix2[row][col] for col in range(3)] for row in range(3)]

# Display the resulting matrix
print("Resulting Matrix after Addition:")
for row in result:
    print(row)
Rotating the Tic-Tac-Toe Board

Imagine you and your friend are playing Tic-Tac-Toe, but with a twist! After some rounds, you decide to rotate the entire board 90 degrees clockwise to make the game more exciting. Now, your task is to take the 3×3 Tic-Tac-Toe board from the user, rotate it 90 degrees clockwise, and display the updated board.
Test Case:
Input:
Enter the 3×3 Tic-Tac-Toe board (use X, O, _ for empty spaces):
X O X
O X O
X O _
Expected Output:
Rotated Tic-Tac-Toe Board:
X O X
O X O
_ O X
Explanation:
The code rotates a 3×3 Tic-Tac-Toe board 90 degrees clockwise.
- First, it initializes an empty list
boardto store user input. - It takes input row by row, where users enter space-separated values (X, O, or _).
- Each row is stored as a 2D list and added to
board.
- Each row is stored as a 2D list and added to
- Next, it transposes the board:
- It creates an empty 3×3 matrix called
transposed. - It loops through each row and column, swapping rows with columns.
- This means the first row becomes the first column, the second row becomes the second column, and so on.
- It creates an empty 3×3 matrix called
- After transposing, it manually reverses each row to achieve the 90-degree rotation:
- It creates another empty 3×3 matrix called
rotated. - It loops through
transposedand reverses each row by placing the last element first, second-last second, and so on.
- It creates another empty 3×3 matrix called
- Finally, it prints the rotated board in a structured format using nested loops.
# Creating an empty 3x3 board
board = []

# Taking input from the user row by row
print("Enter the 3x3 Tic-Tac-Toe board (use X, O, _ for empty spaces):")
for i in range(3):
    row = input().split()  # Taking space-separated input
    board.append(row)

# Step 1: Transpose the board (convert rows into columns)
transposed = [['' for _ in range(3)] for _ in range(3)]  # Empty 3x3 matrix
for i in range(3):
    for j in range(3):
        transposed[j][i] = board[i][j]  # Swapping rows and columns

# Step 2: Reverse each row manually to achieve 90-degree rotation
rotated = [['' for _ in range(3)] for _ in range(3)]
for i in range(3):
    for j in range(3):
        rotated[i][j] = transposed[i][2 - j]  # Reversing the row

# Printing the rotated board
print("\nRotated Tic-Tac-Toe Board:")
for row in rotated:
    for cell in row:
        print(cell, end=" ")
    print()
Garden Plant Watering

Welcome to the Green Thumb Gardening Challenge! You are the head gardener of a 4×4 garden, and you need to water 16 plants. The plants are competing in a “Best Watered” competition. Your goal is to water the plants properly and ensure the highest total water consumption, which will help the plants grow big and strong.
You will input how much water each plant receives. After you’re done, the system will display:
Total water used for the entire garden.
The plant with the most water received in a single spot.
A fun message saying whether you have “Optimized Your Watering” or “Needs Improvement” based on the water totals.
Test Case:
Input:
Enter the water amount (in liters) for plant at position (1,1): 5
Enter the water amount (in liters) for plant at position (1,2): 8
Enter the water amount (in liters) for plant at position (1,3): 7
Enter the water amount (in liters) for plant at position (1,4): 6
Enter the water amount (in liters) for plant at position (2,1): 10
Enter the water amount (in liters) for plant at position (2,2): 12
Enter the water amount (in liters) for plant at position (2,3): 9
Enter the water amount (in liters) for plant at position (2,4): 6
Enter the water amount (in liters) for plant at position (3,1): 3
Enter the water amount (in liters) for plant at position (3,2): 12
Enter the water amount (in liters) for plant at position (3,3): 5
Enter the water amount (in liters) for plant at position (3,4): 4
Enter the water amount (in liters) for plant at position (4,1): 8
Enter the water amount (in liters) for plant at position (4,2): 7
Enter the water amount (in liters) for plant at position (4,3): 6
Enter the water amount (in liters) for plant at position (4,4): 9
Expected Output:
Total water used for the garden: 104 liters.
The plant at position (2, 2) received the most water: 12 liters.
Wow! You’ve Optimized Your Watering! Your plants are thriving.
Explanation:
- This code sets up a 4×4 garden grid, where each cell represents a plant.
- The program uses nested loops to create the grid, filling each plant with
0liters initially. Then, it asks the user to input the water amount (in liters) for each plant, updating each cell in the grid with the user’s input. - Next, it calculates the total water required for all plants by adding up the water values in each cell of the grid.
- A separate loop is used to track the plant that received the most water, updating the
max_watervariable and its position (max_position) whenever a plant’s water level is higher than the current maximum. - Finally, the program displays the total water used in the garden and the plant that received the most water.
- If the total water used is 60 liters or more, it prints a fun message saying the watering was optimized.
- If it’s less than 60 liters, it encourages the user to water their plants a bit more.
# Initialize the 4x4 garden grid using nested loops
garden = []
for i in range(4):
    row = []
    for j in range(4):
        row.append(0)  # Initializing each plant with 0 liters of water
    garden.append(row)

# Input water levels for each plant in the garden
for i in range(4):
    for j in range(4):
        garden[i][j] = int(input(f"Enter the water amount (in liters) for plant at position ({i+1},{j+1}): "))

# Calculate total water required for the entire garden
total_water = 0
for i in range(4):
    for j in range(4):
        total_water += garden[i][j]

# Find the plant that received the most water
max_water = 0
max_position = (0, 0)
for i in range(4):
    for j in range(4):
        if garden[i][j] > max_water:
            max_water = garden[i][j]
            max_position = (i+1, j+1)

# Display results
print(f"\nTotal water used for the garden: {total_water} liters.")
print(f"The plant at position {max_position} received the most water: {max_water} liters.")

# Fun message based on the total water used
if total_water >= 60:
    print("\nWow! You've Optimized Your Watering! Your plants are thriving.")
else:
    print("\nHmm... You could use a little more water for some of your plants. Try again!")
Monthly Expenses Tracker

You’re the financial planner for a superhero team, and you need to track their essential monthly expenses. The team has three primary expenses: Rent, Groceries, and Utilities. The superheroes are a bit disorganized, so you need to collect their expenses for the next 4 months and calculate the total amount spent in each category and per month.
Your task is to input the amount of money spent in each of the 3 categories for 4 months and then calculate and display the total expenses for each month and each category. This will help the superheroes keep track of their spending and ensure they’re not overspending while saving up for their next big mission!
Test Case:
Input:
Enter Rent expense for month 1: $1500
Enter Groceries expense for month 1: $300
Enter Utilities expense for month 1: $150
Enter Rent expense for month 2: $1550
Enter Groceries expense for month 2: $350
Enter Utilities expense for month 2: $180
Enter Rent expense for month 3: $1600
Enter Groceries expense for month 3: $400
Enter Utilities expense for month 3: $200
Enter Rent expense for month 4: $1650
Enter Groceries expense for month 4: $450
Enter Utilities expense for month 4: $250
Expected Output:
Total expenses for month 1: $1950.00
Total expenses for month 2: $2080.00
Total expenses for month 3: $2200.00
Total expenses for month 4: $2400.00
Total expenses for Rent: $6400.00
Total expenses for Groceries: $1500.00
Total expenses for Utilities: $780.00
Explanation:
The code is designed to track and calculate expenses for 4 months across 3 categories (Rent, Groceries, and Utilities).
- It starts by creating a 2D grid (list) called
expenses, where each row represents a month and each column represents a category. - Initially, all values in the grid are set to
0using nested loops:- the outer loop iterates through the 4 months,
- and the inner loop runs through the 3 categories, assigning a value of
0for each.
- After this, the program asks the user to input the expense values for each month and category.
- These values are updated in the grid (
expenses[i][j]), whereirefers to the month andjrefers to the category. - After the user inputs all the data, the program calculates the total expenses for each month by summing the values in each row, and these totals are stored in the
monthly_totalslist. - Similarly, the program calculates the total expenses for each category by summing the values in each column and stores them in the
category_totalslist. - Finally, the program prints the total expenses for each month and each category, formatted with two decimal places.
# Initialize the 4x3 grid for 4 months and 3 categories using a loop
expenses = []
categories = ['Rent', 'Groceries', 'Utilities']

# Initialize the 2D array (4 months and 3 categories)
for i in range(4):  # 4 months
    month_expenses = []
    for j in range(3):  # 3 categories
        month_expenses.append(0)  # Initialize each value to 0
    expenses.append(month_expenses)

# Input expenses for each month and category
for i in range(4):
    for j in range(3):
        expenses[i][j] = float(input(f"Enter {categories[j]} expense for month {i+1}: $"))

# Calculate total expenses for each month
monthly_totals = [0] * 4
for i in range(4):
    for j in range(3):
        monthly_totals[i] += expenses[i][j]

# Calculate total expenses for each category
category_totals = [0] * 3
for j in range(3):
    for i in range(4):
        category_totals[j] += expenses[i][j]

# Display the results
for i in range(4):
    print(f"\nTotal expenses for month {i+1}: ${monthly_totals[i]:.2f}")

for j in range(3):
    print(f"\nTotal expenses for {categories[j]}: ${category_totals[j]:.2f}")
Fitness Tracker

You’re building a simple fitness tracker. Users set goals for three exercises: push-ups, squats, and lunges. They track how many repetitions they do each day.
Goal: Reach a target number of reps for each exercise by the end of the week.
Daily Input: Users enter how many reps they do for each exercise every day.
Feedback: After entering the data, the program will tell them if they met their daily target or how many more they need to reach the goal.
End of Week: The program checks if they met their weekly goals for all exercises.
This helps users stay on track with their fitness goals!
Test Case:
Input:
Day 1:
Enter Push-ups done: 30
Enter Squats done: 60
Enter Lunges done: 50
Day 2:
Enter Push-ups done: 20
Enter Squats done: 40
Enter Lunges done: 40
Day 3:
Enter Push-ups done: 25
Enter Squats done: 50
Enter Lunges done: 45
Day 4:
Enter Push-ups done: 25
Enter Squats done: 50
Enter Lunges done: 60
Expected Output:
Day 1 Summary:
Push-ups: 30/50 (Need 20 more)
Squats: 60/100 (Need 40 more)
Lunges: 50/75 (Need 25 more)
Day 2 Summary:
Push-ups: 20/50 (Need 40 more)
Squats: 40/100 (Need 60 more)
Lunges: 40/75 (Need 35 more)
Day 3 Summary:
Push-ups: 25/50 (Need 15 more)
Squats: 50/100 (Need 50 more)
Lunges: 45/75 (Need 30 more)
Day 4 Summary:
Push-ups: 25/50 (Need 10 more)
Squats: 50/100 (Need 50 more)
Lunges: 60/75 (Need 15 more)
End of Week Summary:
Push-ups: Need 10 more
Squats: Need 50 more
Lunges: Goal reached
Explanation:
The code tracks a person’s fitness progress over 4 days, focusing on three exercises: push-ups, squats, and lunges.
- First, it defines the goals for each exercise (50 push-ups, 100 squats, and 75 lunges).
- It initializes an empty 2D list called
exercisesto store the exercises done each day. - The code uses a loop that runs for 4 days, asking the user to input how many push-ups, squats, and lunges they completed each day. These values are then added to the
exerciseslist for each day. - After collecting the data, the code calculates the total number of exercises done for each type (push-ups, squats, lunges) using another loop.
- For each day, it displays the progress by showing how many exercises were done out of the goal, as well as how many more are needed.
- At the end of the week (after 4 days), the code shows whether the person has reached their goal for each exercise. If not, it tells them how many more exercises they need to reach the goal.
# Initialize the goal for each exercise
pushups_goal = 50
squats_goal = 100
lunges_goal = 75

# Initialize the 2D array to store exercises for each day
exercises = []

# Loop through 4 days for the fitness tracking
for day in range(4):
    print(f"Day {day + 1}:")

    # Get the input for each exercise on that day
    pushups = int(input("Enter Push-ups done: "))
    squats = int(input("Enter Squats done: "))
    lunges = int(input("Enter Lunges done: "))

    # Store the data for the day in the 2D array
    exercises.append([pushups, squats, lunges])

# Initialize total completed exercise counts
pushups_done = 0
squats_done = 0
lunges_done = 0

# Calculate total completed exercises
for day in range(4):
    pushups_done += exercises[day][0]
    squats_done += exercises[day][1]
    lunges_done += exercises[day][2]

    # Display progress for each exercise
    print(f"\nDay {day + 1} Summary:")
    print(f"Push-ups: {exercises[day][0]}/{pushups_goal} (Need {pushups_goal - pushups_done} more)")
    print(f"Squats: {exercises[day][1]}/{squats_goal} (Need {squats_goal - squats_done} more)")
    print(f"Lunges: {exercises[day][2]}/{lunges_goal} (Need {lunges_goal - lunges_done} more)")

# End of week summary
print("\nEnd of Week Summary:")
if pushups_done >= pushups_goal:
    print("Push-ups: Goal reached")
else:
    print(f"Push-ups: Need {pushups_goal - pushups_done} more")

if squats_done >= squats_goal:
    print("Squats: Goal reached")
else:
    print(f"Squats: Need {squats_goal - squats_done} more")

if lunges_done >= lunges_goal:
    print("Lunges: Goal reached")
else:
    print(f"Lunges: Need {lunges_goal - lunges_done} more")
Robot Path Efficiency

A robot moves on a grid in a warehouse. Each number in the grid represents time taken to pass a point. The robot wants to find the fastest row to travel across (smallest sum).
Test Case:
Input:
3 4
3 4 2 5
1 2 3 4
6 5 7 3
Expected Output:
Fastest path is row 2 with total time: 10
Expected:
The code works with a 2D grid and finds the row with the smallest sum, which represents the fastest path.
- The code first asks the user for the grid size (number of rows and columns) and stores these values as integers.
- It initializes an empty list called
gridto hold the grid values. - The user is then prompted to input the grid values row by row. Each row’s values are split into a list of integers, and these values are added to the
grid. - Next, the code looks for the row with the smallest sum of values. To do this, it uses a loop to go through each row and calculate the sum of its values manually by adding up each element.
- If a row has a smaller sum than the previous smallest sum, it updates the
min_timeto the new row’s sum and stores the row number asfastest_row. - Finally, the code prints the row with the smallest sum (the “fastest path”) along with the total time (sum of the values in that row).
# Get the grid size from the user
rows, cols = input("Enter grid size (rows cols): ").split()
rows = int(rows)
cols = int(cols)

# Initialize the grid
grid = []

print("Enter grid values row by row:")
for i in range(rows):
    # Create an empty list for the current row
    current_row = []
    row_values = input().split()
    for j in range(cols):
        # Convert each value to integer and add it to the current row
        current_row.append(int(row_values[j]))
    grid.append(current_row)

# Find the row with the smallest sum
min_time = float('inf')
fastest_row = -1

for i in range(rows):
    row_sum = 0
    # Sum up the values in the row manually
    for j in range(cols):
        row_sum += grid[i][j]

    if row_sum < min_time:
        min_time = row_sum
        fastest_row = i + 1  # 1-based index for readability

# Display the result
print(f"Fastest path is row {fastest_row} with total time: {min_time}")
Chessboard Setup

You have just joined the chess club at your school. The coach asks you to set up a digital chessboard for practice sessions. Your task is to initialize an 8×8 board and correctly place all the pieces in their starting positions. The board should display the correct arrangement, making it easy for players to visualize and strategize their next move.
Test Case:
Expected Output:
[‘R’, ‘N’, ‘B’, ‘Q’, ‘K’, ‘B’, ‘N’, ‘R’]
[‘P’, ‘P’, ‘P’, ‘P’, ‘P’, ‘P’, ‘P’, ‘P’ ]
[ ‘ ‘ , ‘ ‘ , ‘ ‘ , ‘ ‘ , ‘ ‘ , ‘ ‘ , ‘ ‘ , ‘ ‘]
[ ‘ ‘ , ‘ ‘ , ‘ ‘ , ‘ ‘ , ‘ ‘ , ‘ ‘ , ‘ ‘ , ‘ ‘]
[ ‘ ‘ , ‘ ‘ , ‘ ‘ , ‘ ‘ , ‘ ‘ , ‘ ‘ , ‘ ‘ , ‘ ‘]
[ ‘ ‘ , ‘ ‘ , ‘ ‘ , ‘ ‘ , ‘ ‘ , ‘ ‘ , ‘ ‘ , ‘ ‘]
[‘p’, ‘p’, ‘p’, ‘p’, ‘p’, ‘p’, ‘p’, ‘p’ ]
[‘r’, ‘n’, ‘b’, ‘q’, ‘k’, ‘b’, ‘n’, ‘r’ ]
Explanation:
- The code initializes a chessboard using an 8×8 grid represented as a 2D list (
chessboard). - Each square of the board is initially filled with an empty space
' '. - It then sets up the starting positions for the chess pieces. The
pieceslist contains the chess pieces for the first row (for both white and black pieces):'R'for rook,'N'for knight,'B'for bishop,'Q'for queen,'K'for king.- These pieces are placed on the first (
chessboard[0]) and last rows (chessboard[7]), with the black pieces in lowercase ('r','n', etc.).
- The second row (
chessboard[1]) is filled with'P'to represent white pawns, and the second last row (chessboard[6]) is filled with'p'to represent black pawns. - Finally, the program loops through the
chessboardand prints each row, displaying the entire chessboard with the correct piece placements. Each row is printed as a list, representing one row of the chessboard.
# Initialize an 8x8 chessboard
chessboard = [[' ' for _ in range(8)] for _ in range(8)]

# Place pieces in starting positions
pieces = ['R', 'N', 'B', 'Q', 'K', 'B', 'N', 'R']
for col in range(8):
    chessboard[0][col] = pieces[col]  # White pieces
    chessboard[1][col] = 'P'          # White pawns
    chessboard[6][col] = 'p'          # Black pawns
    chessboard[7][col] = pieces[col].lower()  # Black pieces

# Display the chessboard
for row in chessboard:
    print(row)
Dragon’s Dungeon Treasure Game

A hero enters a dungeon where each cell contains gold coins. However, some cells have negative values, which means the hero loses coins due to traps. Find the safest row where the hero loses the least coins (highest sum).
Test Case:
Input:
3 4
5 -2 4 6
-3 8 -1 7
9 -5 3 4
Expected Output:
Safest path is row 3 with total gold: 11
Explanation:
The code processes a 2D grid representing a dungeon and identifies the safest path based on the highest gold collected in a row.
- The code starts by asking the user to input the dungeon’s size (number of rows and columns).
- It converts the input into integers and stores them as
rowsandcols. - An empty list
dungeonis initialized to store the grid values. - The user is then prompted to input the dungeon values row by row.
- Each row is split into individual string values, which are converted to integers and stored in a list called
current_row.
- Each row is split into individual string values, which are converted to integers and stored in a list called
- The
current_rowis then added to thedungeonlist. - The code then looks for the row with the highest sum of values.
- It initializes
max_goldto a very low value andsafest_rowto-1. - It loops through each row and sums the values manually by adding each element in the row to
row_sum.- If the sum of the current row is greater than
max_gold, themax_goldis updated and thesafest_rowis set to the current row number (with a 1-based index).
- If the sum of the current row is greater than
- Finally, the code prints the safest row and the total gold in that row in a readable format.
# Input grid dimensions
rows, cols = map(int, input("Enter dungeon size (rows cols): ").split())

# Initialize the dungeon grid
dungeon = []

# Input dungeon values
print("Enter dungeon values row by row:")
for i in range(rows):
    row_values = input().split()
    current_row = []
    for value in row_values:
        current_row.append(int(value))
    dungeon.append(current_row)

# Find the row with the highest sum (safest path)
max_gold = float('-inf')
safest_row = -1

for i in range(rows):
    row_sum = 0
    # Manually sum the row
    for j in range(cols):
        row_sum += dungeon[i][j]

    if row_sum > max_gold:
        max_gold = row_sum
        safest_row = i + 1  # 1-based index for readability

print(f"Safest path is row {safest_row} with total gold: {max_gold}")
Flight Seat Occupancy Tracker

You are tasked with creating a seat occupancy tracker for a flight. The airline needs to track how many seats are occupied and how many are available. You will use a 2D grid to represent the seating chart of the plane, where each seat can either be empty (0) or occupied (1). The seating arrangement will be provided by the user, and the system should calculate and display the total number of occupied seats.
Test Case:
Input:
Enter number of rows: 3
Enter number of columns: 3
Enter seat occupancy (1 for occupied, 0 for empty):
Seat[1][1]: 1
Seat[1][2]: 0
Seat[1][3]: 1
Seat[2][1]: 0
Seat[2][2]: 1
Seat[2][3]: 1
Seat[3][1]: 1
Seat[3][2]: 1
Seat[3][3]: 0
Expected Output:
Total occupied seats: 6
Explanation:
- The code starts by asking the user to input the number of rows and columns for the seating chart. These values are stored in the variables
rowsandcols. - Then, an empty list
seating_chartis created to represent the grid of seats. - The program asks the user to enter the seat occupancy for each seat, using a loop.
- It expects the user to enter either
0(empty seat) or1(occupied seat). - A
whileloop ensures that the program keeps asking for input until the user provides valid data (either0or1). - If the user enters an invalid value, the program will prompt them to re-enter the value for that seat.
- It expects the user to enter either
- For each row (
row), the program uses another loop to ask for each seat’s status in that row. It adds each seat value to the corresponding row in theseating_chart. - After the seating chart is filled, the program counts the total number of occupied seats. It uses another set of
whileloops to go through each row and column of the grid. If a seat is occupied (1), theoccupied_seatscounter is incremented. - Finally, the program prints the total number of occupied seats.
# Input grid dimensions
rows = int(input("Enter number of rows: "))
cols = int(input("Enter number of columns: "))

# Initialize the seating chart grid
seating_chart = []

# Input seating chart values
print("Enter seat occupancy (1 for occupied, 0 for empty):")
row = 0
while row < rows:
    seating_chart.append([])
    col = 0
    while col < cols:
        seat = int(input(f"Seat[{row+1}][{col+1}]: "))
        # Check if the input is valid (either 0 or 1)
        if seat == 0 or seat == 1:
            seating_chart[row].append(seat)
        else:
            print("Invalid input! Please enter either 0 (empty) or 1 (occupied).")
            continue  # Ask the user to input again if invalid
        col += 1
    row += 1

# Count the total number of occupied seats
occupied_seats = 0
row = 0
while row < rows:
    col = 0
    while col < cols:
        if seating_chart[row][col] == 1:
            occupied_seats += 1
        col += 1
    row += 1

print(f"Total occupied seats: {occupied_seats}")
Validating Data Packets in a Computer Network

You are simulating the transfer of data packets in a network, where each packet is a binary string. A valid packet starts with 1, ends with 0, and contains only 0s and 1s in between. Your task is to check multiple packets and determine if they are valid. For valid packets, print "Packet X is valid", and for invalid ones, print "Packet X is invalid", where X is the packet’s position in the list.
Test Case:
Input:
Enter the number of packets: 5
Enter packet 1: 100110
Enter packet 2: 111000
Enter packet 3: 1011100
Enter packet 4: 011010
Enter packet 5: 1001001
Expected Output:
Packet 1 is valid
Packet 2 is valid
Packet 3 is invalid
Packet 4 is invalid
Packet 5 is valid
Explanation:
- The code begins by asking the user to input the number of packets, which is stored as an integer in the variable
num_packets. - It then initializes an empty list called
packetsto store the individual packets. - A loop runs
num_packetstimes to take input for each packet. For each packet, the code takes the input as a string and converts it into a list of characters usinglist(input()). This list of characters is then added to thepacketslist. - After collecting all the packets, the code proceeds to check the validity of each packet.
- For each packet, it checks three conditions:
- Whether the packet starts with ‘1’. This is done by checking
packet[0] == '1'. - Whether the packet ends with ‘0’. This is checked with
packet[-1] == '0'. - Whether all the characters in the packet are either ‘0’ or ‘1’. It uses a loop to check each character, and if any character is not ‘0’ or ‘1’, the variable
valid_bitsis set toFalse.
- Whether the packet starts with ‘1’. This is done by checking
- If all conditions are met, the packet is considered valid, and the code prints that the packet is valid. Otherwise, it prints that the packet is invalid.
# Input the number of packets
num_packets = int(input("Enter the number of packets: "))
packets = []

# Input packets (store as lists of characters)
for i in range(num_packets):
    packet = list(input(f"Enter packet {i + 1}: "))  # Convert each packet into a list of characters
    packets.append(packet)

# Check each packet's validity
for i in range(num_packets):
    packet = packets[i]

    # Check if packet starts with '1'
    starts_with_1 = packet[0] == '1'

    # Check if packet ends with '0'
    ends_with_0 = packet[-1] == '0'

    # Check if all characters in the packet are either '0' or '1'
    valid_bits = True
    for char in packet:
        if char != '0' and char != '1':
            valid_bits = False
            break

    # If all conditions are met, it's a valid packet
    if starts_with_1 and ends_with_0 and valid_bits:
        print(f"Packet {i + 1} is valid")
    else:
        print(f"Packet {i + 1} is invalid")
Sudoku Validator

Imagine you’re working on a Sudoku application where users input their puzzle solutions. To ensure the puzzle is solved correctly, you need to validate whether the solution follows the rules of Sudoku. Specifically, you must check if the 9×9 grid is valid, meaning no duplicates should appear in any row, column, or 3×3 subgrid. This will help you confirm that the solution is correct before presenting it to the user.
The program should:
Accept a 9×9 Sudoku grid.
Check if the grid contains any duplicate numbers in rows, columns, or 3×3 subgrids.
Output whether the grid is valid or invalid based on these conditions.
Test Case:
Input:
Enter the 9×9 Sudoku grid row by row (space-separated values for each row):
Enter row 1: 5 3 4 6 7 8 9 1 2
Enter row 2: 6 7 2 1 9 5 3 4 8
Enter row 3: 1 9 8 3 4 2 5 6 7
Enter row 4: 8 5 9 7 6 1 4 2 3
Enter row 5: 4 2 6 8 5 3 7 9 1
Enter row 6: 7 1 3 9 2 4 8 5 6
Enter row 7: 9 6 1 5 3 7 2 8 4
Enter row 8: 2 8 7 4 1 9 6 3 5
Enter row 9: 3 4 5 2 8 6 1 7 9
Expected Output:
Sudoku Grid is Valid: True
Explanation:
- The code starts by initializing an empty list called
sudoku_gridto store the 9×9 Sudoku grid. - It then prompts the user to input the grid row by row.
- For each row, the user inputs space-separated values.
- The code checks that each row contains exactly 9 values; if not, it prints an error message and stops the program using
exit(). - Once the row is confirmed to have 9 values, each string value in the row is converted to an integer using a list comprehension (
[int(num) for num in row]) and added to thesudoku_grid. - After collecting all rows, the code checks for duplicates.
- First, it checks each row for duplicates by iterating through the elements of the row.
- If any number appears more than once, it sets
validtoFalseand breaks out of the loop.
- If any number appears more than once, it sets
- Then, the code checks each column for duplicates.
- For each column, it iterates through all rows and collects the numbers in the column. If any number is repeated in the column, it sets
validtoFalseand breaks out of the loop.
- For each column, it iterates through all rows and collects the numbers in the column. If any number is repeated in the column, it sets
- Finally, the code checks each 3×3 subgrid (nonet) for duplicates.
- It does this by iterating through each 3×3 subgrid and checking all the numbers within the subgrid for duplicates.
- If any duplicates are found, it sets
validtoFalseand stops checking further.
- First, it checks each row for duplicates by iterating through the elements of the row.
- Once all checks are completed, the code prints whether the Sudoku grid is valid based on the checks performed.
- If any duplicates were found in rows, columns, or subgrids, it prints
False; otherwise, it printsTrue.
# Initialize a 9x9 Sudoku grid by taking user input
sudoku_grid = []

print("Enter the 9x9 Sudoku grid row by row (space-separated values for each row):")
for i in range(9):
    row = input(f"Enter row {i + 1}: ").split()
    if len(row) != 9:
        print("Each row must have exactly 9 numbers.")
        exit()  # Exit if input is invalid
    row = [int(num) for num in row]  # Manually convert string to integers
    sudoku_grid.append(row)

# Check rows for duplicates
valid = True
for row in sudoku_grid:
    seen = []
    for num in row:
        if num in seen:
            valid = False
            break
        seen.append(num)

# Check columns for duplicates
if valid:
    for col in range(9):
        seen = []
        for row in range(9):
            if sudoku_grid[row][col] in seen:
                valid = False
                break
            seen.append(sudoku_grid[row][col])

# Check 3x3 subgrids for duplicates
if valid:
    for i in range(0, 9, 3):
        for j in range(0, 9, 3):
            seen = []
            for x in range(i, i + 3):
                for y in range(j, j + 3):
                    if sudoku_grid[x][y] in seen:
                        valid = False
                        break
                    seen.append(sudoku_grid[x][y])
                if not valid:
                    break
            if not valid:
                break

# Final validation result
print("Sudoku Grid is Valid:", valid)
For more Python topics, solutions to common problems, and scenario-based questions on various Python concepts, visit Python at Syntax Scenarios.